Windows Not Showing WiFi Networks
Windows computers come with built-in Wireless Adapters, which allows them to automatically scan for WiFi Networks in the vicinity and list them on your computer. If your computer is not showing Wi-Fi Networks, the problem could be due to change in Network Settings, Incompatible or Outdated Network Drivers and other reasons.
1. Restart Computer
Restarting the computer can often fix network connectivity issues by closing stuck programs and processes, which might be causing the problem on your computer.
2. Run Network Troubleshooter
If restarting did not help, see if the problem can be fixed by the built-in Network Troubleshooter as available in Windows 10. Go to Settings > Network & Internet > scroll down in the right-pane and click on Network Troubleshooter.
Wait for the troubleshooter to detect issues and follow the onscreen Instructions to fix problems on your computer. If the Network Troubleshooter is unable to fix the problem, move to the next troubleshooting step.
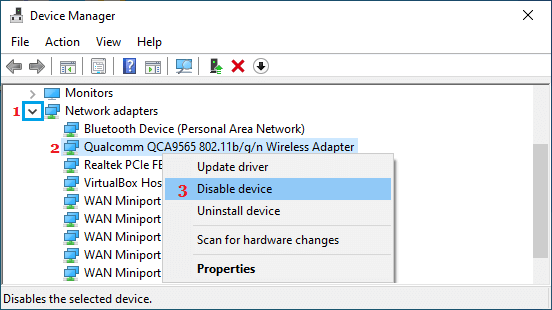
3. Restart Network Adapter
Right Click on the Start button and click on Device Manager. On Device Manger Screen, expand Network Adapters entry > right-click on your Wireless Adapter and select Disable Device option.
After 15 seconds, right-click on Wireless Adapter again and this time select Enable Device option.
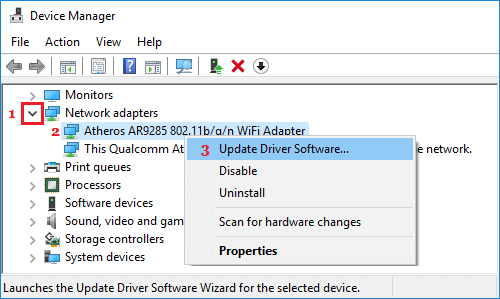
4. Update Network Driver
Right-click on the Start button and click on Device Manager. On Device Manger Screen, expand Network Adapters entry > right-click on the Wirekess Adapter and click on Update Driver Software option.
Tip: If you see multiple entries under Wireless Adapters, look for something that has Wi-Fi in it or says Network or 802.11b. On the next screen, select Search Automatically for Updated Driver Software option. Wait for your computer to search for the Latest Driver Software as available for the Wireless Adapter and follow the onscreen instructions to Install the driver software (If available).
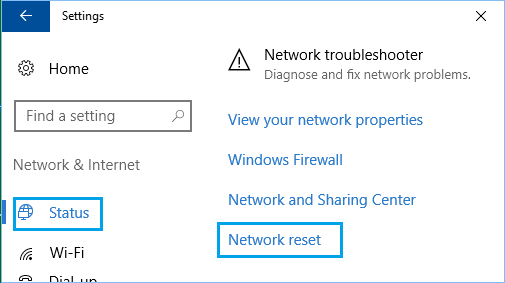
5. Reset Network Settings
As mentioned above, the problem could be due to a change or corruption in Network Settings. Go to Settings > Network & Internet > scroll down in the right-pane and click on Network Reset option.
On the next screen, click on Reset Now button to Reset Network Settings on your computer to Factory Default Settings. Note: This process will erase all your current Network Settings, including your Wi-Fi and VPN Passwords. Hence, it is a good idea to note down your Wi-Fi and VPN Passwords.
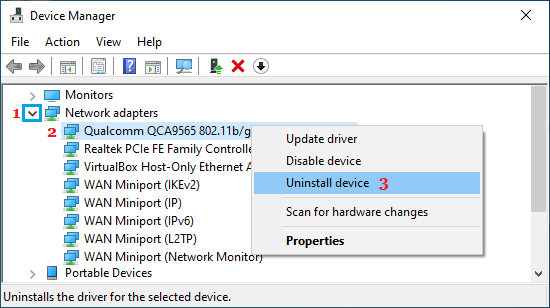
6. Uninstall Wireless Adapter Driver
Right Click on the Start button and click on Device Manager. On Device Manager screen, expand Network Adapter entry > right-click on the Wireless Adapter and click on Uninstall device option.
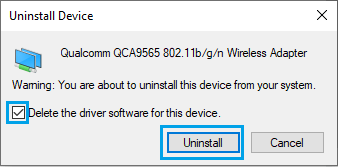
On the confirmation pop-up, check Delete driver software for this device option and click on Uninstall.
Restart your computer and Windows should automatically install the right driver software. Note: In rare cases, Windows may fail to install the right driver. If this happens, manually download the driver software from the manufacturers website and install it on your computer.
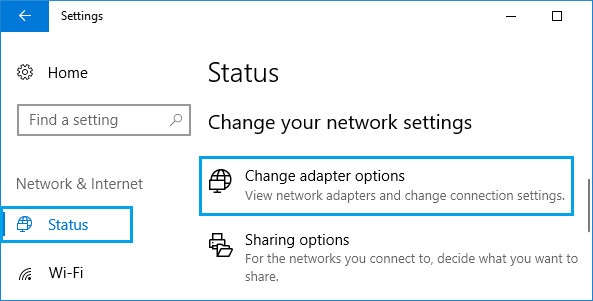
7. Diagnose Network Connections
Go to Settings > Network & Internet > scroll down in the right-pane and click on Change Adapter Options.
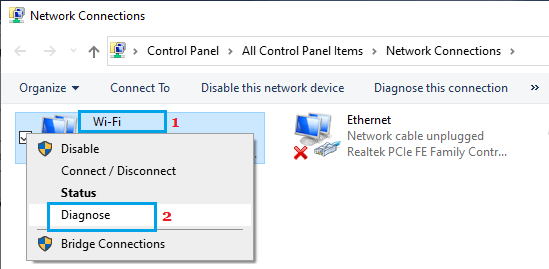
On the next screen, right-click on your Network and select the Diagnose option.
Wait for the process to be completed and see if your computer is now listing available Wi-Fi Networks.
8. Release & Renew IP Address
Follow the steps below to remove the current self-assigned IP Address from your computer and obtain a New IP Address. Open Command Prompt (Admin) > In Command prompt window, type ipconfig /release and press the enter key. This will release the current IP Address of your computer.
Next, type ipconfig /renew and press the enter key to renew the IP Address of your computer. Close the Command Prompt window and restart your computer.
9. Power Flush Modem/Router
Unplug the Modem/Router from its power supply source and patiently wait for 60 seconds > reconnect the Modem/Router to power supply source and wait for all the lights to turn green. After this, you should be able to view Wi-Fi Networks listed on your computer.
How to Hide/Block WiFi Networks in Windows 10/11 How to Switch to Google DNS On Windows and Mac