Logitech is a renowned name in the world of computer peripheral manufacturers. The mouse from the company is known across the globe for its top-notch performance. However, recently many users reported facing an annoying glitch where their Logitech wireless mouse is not working. We understand how frustrating it can be if the Logitech wireless mouse has stopped working since the mouse is among the vital peripheral devices. However, you can keep all your worries aside as this article acquaints you with some tried and tested solutions to this problem. Before jumping to these fixes, it is crucial to understand why the Logitech wireless mouse is not working. You can fix the issue pretty effortlessly if you know what triggered it in the first place. Hence, let us discuss the same first.
Reasons Logitech Wireless Mouse Is Not Working
The following may be possible reasons your Logitech wireless mouse has stopped working on Windows 10 or Windows 11 computers.
Problems with the mouse driverBattery issuesInterference from other electrical or metal devicesIssues with the unifying receiver or USB port
Above were the most probable causes of the Logitech wireless mouse not working issue. Now that you are familiar with what may have caused the problem, let us discuss how to fix it.
Fixes to Logitech Wireless Mouse Not Working Issue (100% Working)
The following are some of the most effective solutions to the problems due to which your Logitech wireless mouse has stopped working.
Fix 1: Check your mouse’s batteries
Low battery power may be a reason you encounter the Logitech wireless mouse not working on Windows 11 and Windows 10 problems. Hence, you should try replacing the existing batteries with a new set of batteries. If your wireless mouse is rechargeable, you should charge the mouse and check whether or not your mouse is functioning. Try the next solution if the mouse does not work. Also Read: How to Fix Mouse Right Click Not Working in Windows
Fix 2: Try removing the unifying receiver and batteries for some time
Your mouse can restart and the computer can recognize it again if you remove the unifying receiver and batteries for five seconds. Thus, you should take out the unifying receiver and batteries for the said duration and then connect them again to fix the issue.
Fix 3: Use another USB port
Sometimes, the USB hub is unable to provide enough power to the mouse, resulting in problems like the Logitech wireless mouse not working. Hence, connecting the unifying receiver to the computer through another USB port can help you solve the problem. You should keep switching ports until the issue is resolved. If the problem persists even after trying all the ports, you can jump to the next solution.
Fix 4: Update the Logitech wireless mouse driver (Recommended)
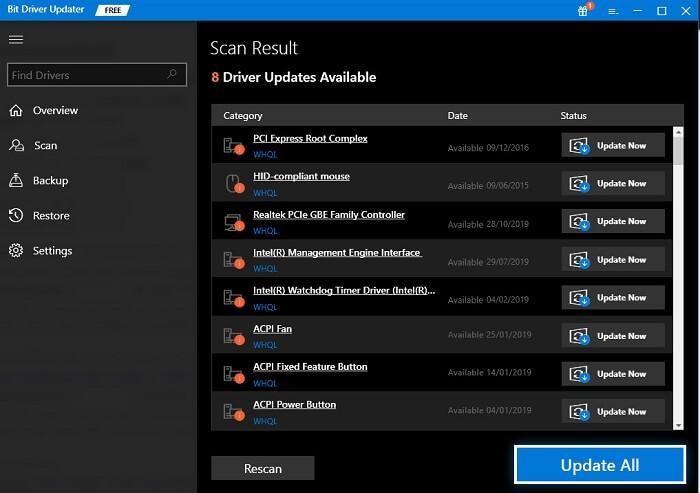
A driver is a link between the computer and your mouse. An outdated driver is among the top culprits behind issues like Windows 10/Windows 11 Logitech wireless mouse not working. Hence, updating the driver is the most recommended solution to the problem. You can update your mouse and all other out-of-date drivers effectively and effortlessly with a program like Bit Driver Updater. The Bit Driver Updater software updates all drivers safely and automatically with just a click. Moreover, it provides a lot of other benefits, such as driver backup and restore, acceleration of driver download speed, scheduled scans, and much more. You can click on the link shared below to get this incredible driver update software for windows 10 on your computer.
A few seconds after installing the software, a list of outdated drivers appears on your screen. You can Update All these problematic drivers automatically with a single click on the button to do it (you may use the arrow keys on your keyboard). There is also an Update Now option to update only the Logitech wireless mouse driver. However, we and many other tech experts prefer updating all drivers for windows 10 for better computer performance. Also Read: How To Fix Mouse Jumping Around Windows 10
Fix 5: Reinstall the Logitech wireless mouse driver
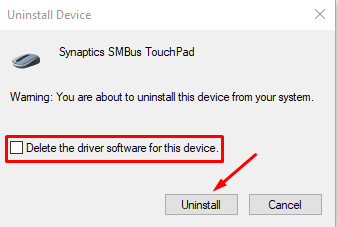
A faulty or improperly installed driver can also be a reason your Logitech wireless mouse has stopped working. Therefore, you should reinstall the mouse driver to fix the issue. The following are the directions to do it.
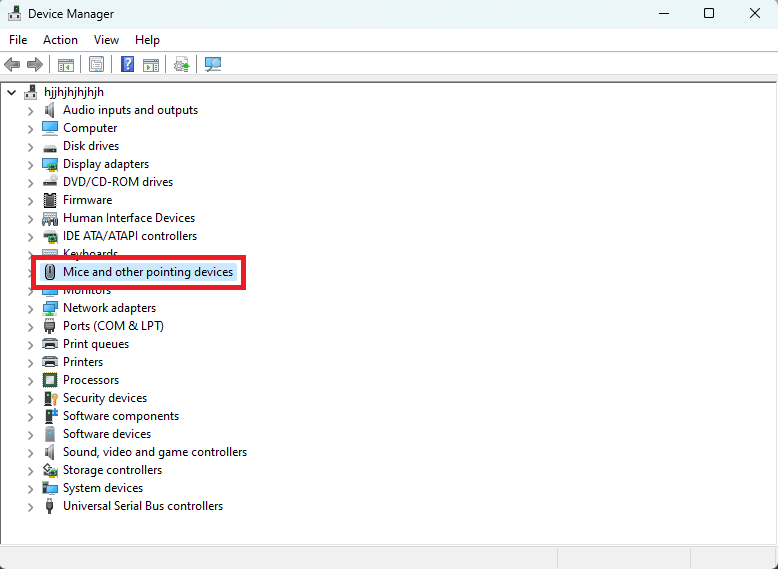
Firstly, press your keyboard’s Windows key to access the search functionality on your computer.Now, key in Device Manager and hit the Enter key to open it.Use the down arrow key to reach Mice and other pointing devices. Now, expand the Mice and other pointing devices using the arrow keys.Using the arrow key, arrive at the Logitech wireless mouse and press the Enter key to open its properties.Now, you may use the Tab+End arrow key to move to the Driver tab.Use the Tab key to reach the Uninstall device button.Press the Enter key to uninstall device.Hit the Enter key again and wait until the uninstallation is complete.Restart your computer after the uninstallation completes to reinstall the mouse driver.
Fix 6: Use the mouse on a different surface
Electrical and metal items may hinder the mouse signal and cause issues like the Windows 10/Windows 11 Logitech wireless mouse not working. Hence, you should keep the mouse away from such items and not on surfaces like cables or long metal rails.
Fix 7: Update your mouse’s firmware
Firmware update helps fix the random glitches that may be responsible for the Logitech wireless mouse stopped working issue. Thus, you can follow these steps to update the firmware of your mouse. Note that you can use the keyboard shortcuts to perform the below steps if there is no mouse available at all.
Firstly, travel to the official website of Logitech.Now, select Downloads from the options available in the menu at the top.Click on the Firmware Update Tool.Select Update Now to get the setup of the Firmware Update Tool downloaded on your device.Run the downloaded file and follow the instructions to complete the Firmware Update Tool’s installation.Now, select Continue to begin the firmware update process.Wait until Logitech detects your mouse and updates its firmware.After completing the above steps, check whether or not your Logitech wireless mouse has started working. If not, try the below solution.
Fix 8: Perform mouse reset
Resetting the mouse can fix the random glitches that may be responsible for the Windows 10 and Windows 11 Logitech wireless mouse not working issue. Hence, you should press and hold the small reset button (generally present at the mouse’s bottom) for a few seconds to reset your mouse. The detailed steps to reset the mouse slightly differ from model to model. Thus, you should also check your mouse’s instruction manual for the exact steps to reset it. Also Read: How to Update Logitech Mouse Driver In Windows 11,10 PC
Logitech Wireless Mouse Not Working Problem Fixed
This article shared various effective solutions to the Logitech wireless mouse stopped working problem. You may try them sequentially or directly update drivers through Bit Driver Updater to fix the issue quickly and easily. If you have any questions or doubts about this guide, please drop us a comment. We will be extremely happy to address your queries. And, stay connected with us for more guides and updates from the tech world.


