Logitech is known worldwide for making phenomenal wireless gaming headsets. G935 is one of them. However, many users recently reported that their Logitech G935 mic is not working for unknown reasons. If, like all these users, you are also wondering, “why is my Logitech G935 mic not working” and wish to fix it, this article is for you. This write-up provides you with detailed insight into the problem along with its best possible solutions. Let us begin with understanding the underlying causes of the issue.
Why Is Logitech G935 Mic Not Working
The following are some reasons your Logitech G935 mic may not be working on Windows PC.
Windows do not have access to the microphoneLogitech G935 is not your default micThe microphone is disabledIncorrect or out-of-date audio driverUnresolved hardware problems
Above was what might have gone wrong with your Logitech G935 mic. Now, let us learn how to fix it if it is not working on Windows.
Fixes to the Logitech G935 Mic Not Working Issue
You may apply the following solutions to fix the Logitech G935 mic not working issue.
Fix 1: Give Windows microphone access
Windows need to have the necessary permissions to access the microphone. Your Logitech G935 wireless mic may not be working on Windows PC due to the absence of these authorizations. Hence, below is how to provide the necessary permission to fix the problem.
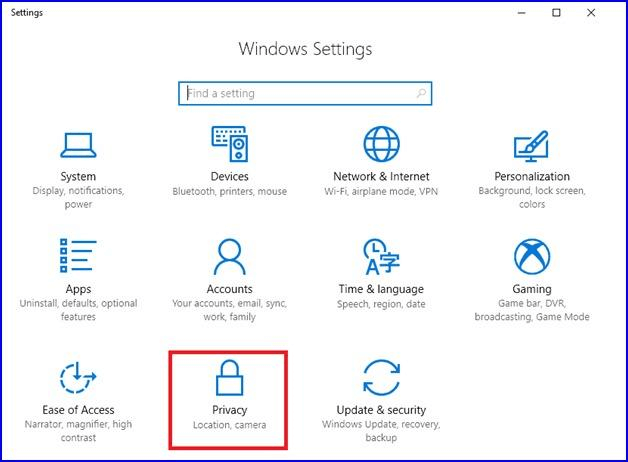
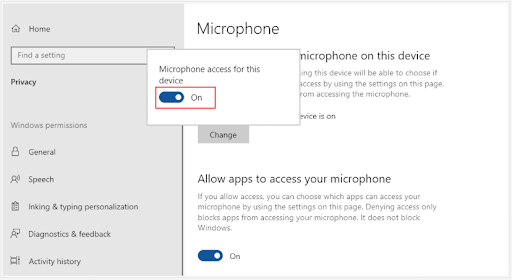
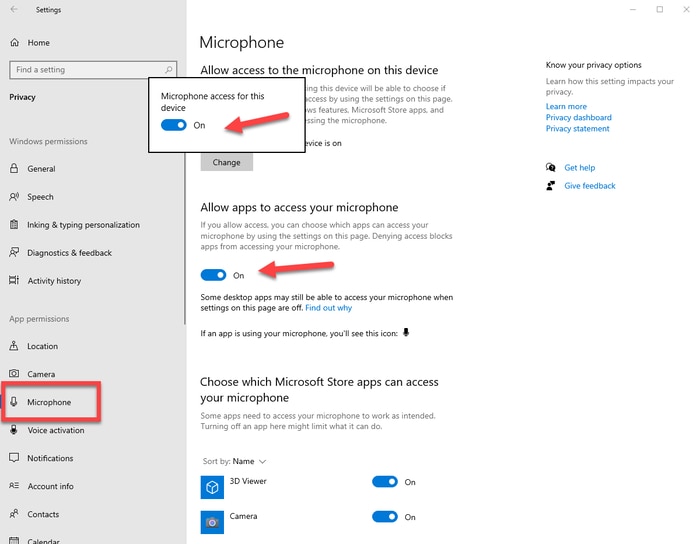
Select Start from the lower left corner of the screen.Click on the gear, i.e, settings icon.Choose Privacy from the menu on your screen.Choose Microphone from app permissions.Select Change and turn on the microphone on this device. Allow apps access to your microphone. Check whether the above process helped you fix the Logitech G935 mic not working problem or not.
Also Read: Logitech Speaker Drivers Download for Windows
Fix 2: Ensure the microphone is not disabled and set it as default
Discord Logitech G935 mic may not be working if it is not disabled or isn’t your default device. Hence, you may take the following steps to enable and set it as default.
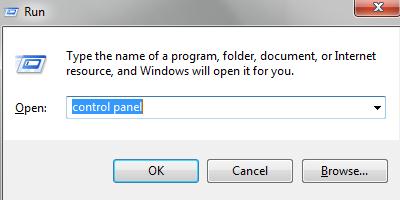
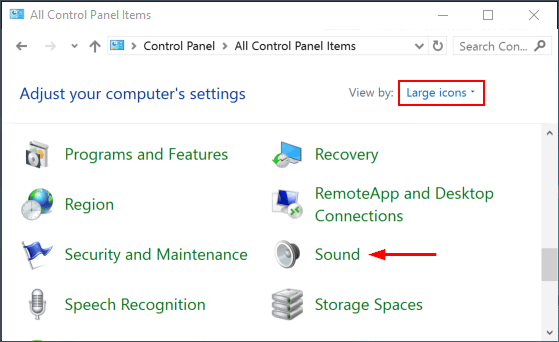
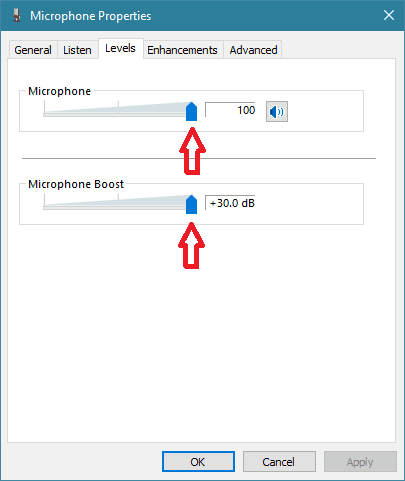
Use the Windows and R keys in combination to launch the Run utility.Input Control to open it and click OK/press Enter.Change the Control Panel’s view to Large icons. Choose Sound from the menu on your screen.Select Recording from the top menu, click the empty space inside the Sound window, and pick the option to Show Disabled Devices. Right-click on the Headset Microphone and choose Enable from the available options.After enabling the microphone, right-click on it and choose the set as default option.Right-click on the microphone and pick the Properties option.Drag the volume slider present under the Levels tab to the maximum value.Click OK to make the changes applicable to your microphone.Lastly, confirm whether the issue is fixed or the Logitech G935 gaming headset mic is not working.
Also Read: How to Fix Logitech G930 Headset Driver Problems
Fix 3: Update your device’s audio driver (Recommended)
Outdated drivers are among the most commonly seen reasons behind issues like the Logitech G935 mic not working after muting. Therefore, updating the drivers is one of the strongly recommended fixes to the issue. It takes only a few seconds to update drivers with a dedicated tool like Bit Driver Updater. The Bit Driver Updater program needs only a single click to download and install all the latest driver updates automatically. Moreover, the Bit Driver Updater software provides users with a plethora of useful options. Some of them include driver backup creation and restoration, download speed acceleration, and scheduling of scans. The following is the link from where you may download the Bit Driver Updater software and experience the same.
Within a few seconds of software downloading and installation, you get all outdated drivers listed on the screen. All you need to do is click on the tab to Update All. You may update the audio driver singly if you wish to do so using the Update Now tool. However, updating all drivers is the expert’s recommendation to keep all computer problems away.
Fix 4: Check your computer/headset for hardware issues
Your computer or headset hardware may be at fault, causing issues like the Logitech G935 mic not working on the PC. Hence, you should take the below steps to fix it.
Connect the headset to your computer’s other port.If changing the port did not fix the Logitech G935 mic not working issue, connect the headset to any other computer.If the mic starts working after connecting to another computer, you need to take expert help to fix your original computer.
Fix 5: Update your computer’s operating system
Operating system updates bring fixes to almost all common issues, like the Logitech G935 mic not working. Hence, you may update the OS to drive the problem away. Below given are the steps to do it.
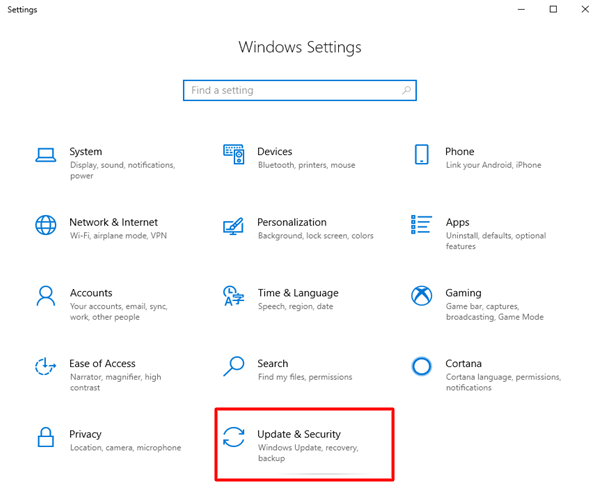
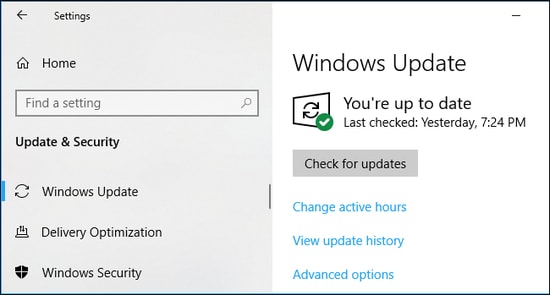
Launch the settings panel on your desktop.Open the setting called Update & Security.Check for updates to your Windows operating system.Download & Install the update suggested for your system.Restart your computer to complete the above process.
Also Read: How to Fix Logitech Keyboard Lagging on Windows
Fix 6: Perform sound troubleshooting
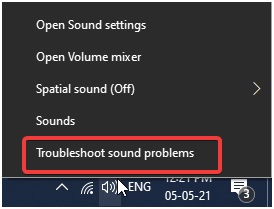
Your computer has a troubleshooting mechanism for audio issues, such as the Logitech G935 gaming headset mic not working. Below is how to use it to resolve the issue you are experiencing.
Right-click on the speaker icon located at the bottom right corner of the taskbar.Choose the option to Troubleshoot sound problems.Follow the instructions to complete the troubleshooting process.
Fix 7: Remove and insert the battery again
Removing the battery and inserting it again is also one of the ways to fix the random bugs causing the Logitech G935 mic not working problem. Below are the directions you may follow to do it.
Remove the right earcup’s side plate.Turn on the headset to use the latent charge, if any.Insert the battery again and put the headset to charge again.
Also Read: How to fix Logitech Unifying Receiver Not Working in Windows PC
Logitech G935 Mic Not Working: Fixed
Above, we shared various fixes you may apply to get rid of the Logitech G935 mic not working issue on Windows PC. You may start troubleshooting the problem from the first fix and then move on to the next fixes until the issue is resolved. However, if you find it difficult to try all the solutions, you may update all outdated drivers instantly using Bit Driver Updater to save time and effort. We will return with another tech guide soon. Until then, you may go through the other articles presented on this blog to help you solve various tech issues. And you may contact us through the comments section if you have any doubts, questions, or concerns.
