It suggests that something is wrong with your computer components. But, it’s hard to specify what triggers this error, but it’s been noticed that it occurs when you try to perform a graphics-intensive task. However, after reading this post, you’ll be able to fix live kernel event 141 error, quite easily.
4 Quick Solutions to Fix LiveKernelEvent 141 Hardware Error on Windows PC
There are some industry-grade, tried, and tested solutions that you can use to get rid of the LiveKernelEvent 141 error. These solutions include updating GPU drivers, stopping overclocking, installing the latest system updates, and running a disk check. Well, you may not try them all, just work your way down through each until you find the solution that works for you and be the answer to “how to fix LiveKernelEvent 141 hardware error”. So, without much build-up, let’s get started with the solutions.
Solution 1: Update GPU Driver
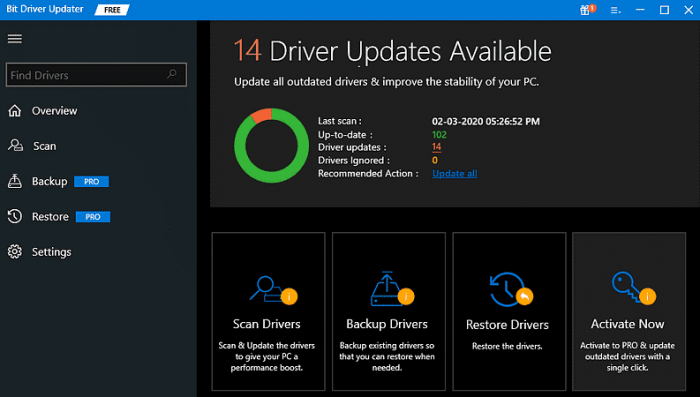
GPU is a substantial contributor to your system’s performance, especially during the gameplay. An outdated or faulty driver may hold back your GPU from giving its best performance and can be the utmost cause for LiveKernelEvent 141 error. So, before diving into more complex solutions, let’s ensure that your driver is updated. Here are two ways, that you can use to update your driver: Manual Driver Update: If you have enough time, patience, and skills to update your driver manually, you can opt for this path. To manually update your driver, the steps are: Step 1: Go to the manufacturer’s official website. Step 2: Find the latest driver available for your system. Step 3: Download and install the driver on your PC. Note: Manual method of driver update can be a little tricky and error-prone. Hence, it’s not recommended for someone who does not possess enough computer quotient for doing so. For all such people, we suggest you go with an automatic driver update. Automatic Driver Update: So, if you want to save your time, effort, and want a hassle-free driver update experience. We’ve brought you a Bit Driver Updater. Bit Driver Updater is one of the best driver updater tools available on the internet. It has some cool features and it’s also easy to use. It will allow you to update your driver without sweat. The feature palette of Bit Driver Updater contains: By using these features, you’ll get a top-notch experience and you’ll also be able to update your drivers with ease. Here’s a step-by-step guide, on how you can use Bit Driver Updater to update your drivers: Step 1: Download Bit Driver Updater from its official website. You can also get its setup file from the below-given download button. Later, follow the wizard to install it on your PC.
Step 2: Launch Bit Driver Updater and click on the ‘Scan’ option Bit Driver Updater will then deeply scan your PC for any sign of outdated or faulty drivers.
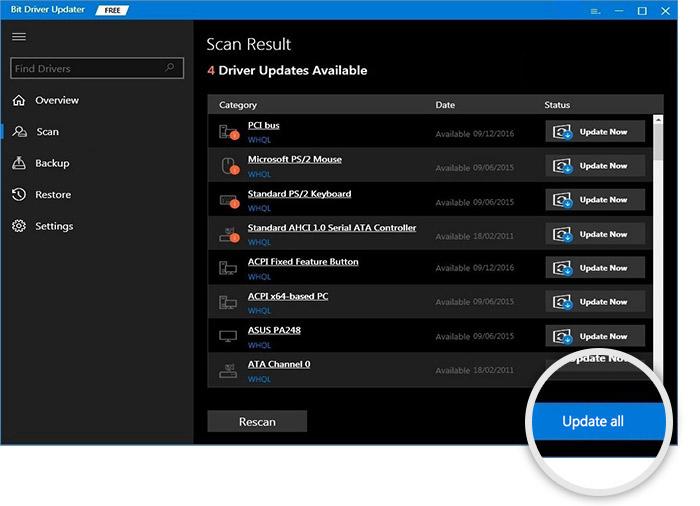
Step 3: Click on the ‘Update Now‘ button listed next to the flagged graphics driver to automatically download the latest version of that driver. Then you can install it on your PC. Step 4: Or you can simply click on the ‘Update All‘ button and it will automatically download and install the latest drivers on your PC. Note: Using the ‘Update All’ feature requires a pro version.
Also Read: [Solved] The Last USB Device You Connected to this Computer Malfunctioned Error
Solution 2: Stop Overclocking
Want to fix the live kernel event 141 hardware error? Try stopping overclocking. Overclocking might be the reason for all errors you’re facing. Using overclocking may give your gameplay a boost. But, it can deteriorate your system’s stability at the same time. To resolve this, you can simply shut down overclocking utilities like MSI Afterburner and reconfigure the clock speed to normal. This may resolve your errors, if not, let’s move on to the next solution.
Solution 3: Check For Windows Updates
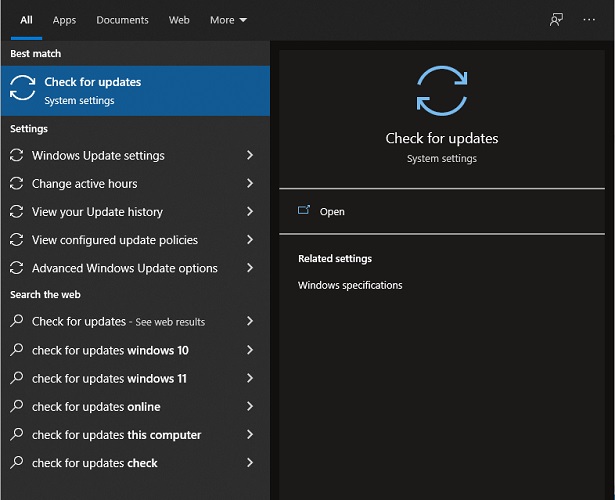
If your system is not up-to-date, it also gives birth to LiveKernelEvent 141 error. If you haven’t checked for windows updates for a long time, we think it’s time for it. The steps for doing so are: Step 1: Type ‘Update‘ in the Windows search box and then click on ‘Check for updates’.
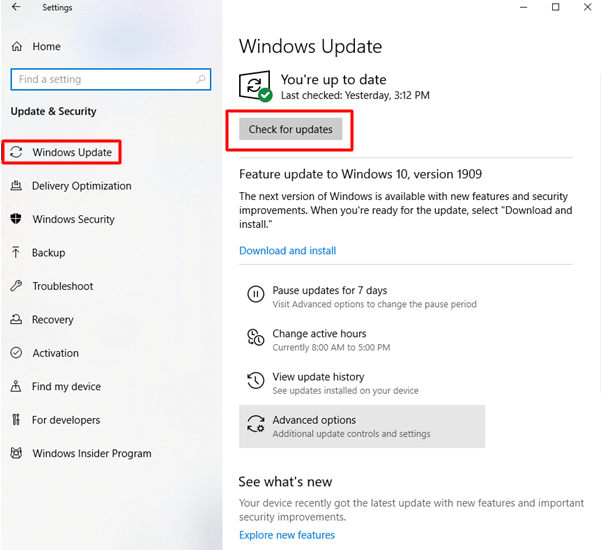
Step 2: After clicking on ‘Check for updates, it will look for any available updates for your PC. If yes, then it’ll download and install them, automatically.
Step 3: After it completes, reboot your system to normalize the changes. See, if the issue still persists or not. If yes, let’s take a glimpse at the next solution. Also Read: How to Fix Data Error (Cyclic Redundancy Check) [SOLVED]
Solution 4: Try Running A Disk Check
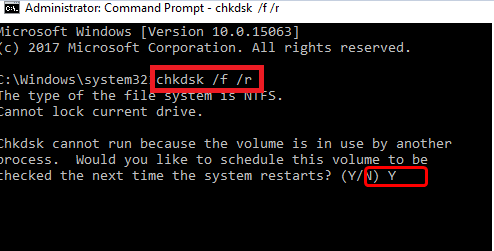
A hard disk is one of the most important parts of a PC. To check if the problem is in your hard disk, you can run a simple check using the CHKDSK tool. Here we’re listing steps for doing so: Step 1: Type ‘cmd‘ in the Windows search box. Then, right-click ‘Command Prompt‘ and select ‘Run as administrator. Step 2: Click ‘Yes‘ when prompted. Step 3: In Command Prompt, type ‘chkdsk C: /f /r /x‘ and then press ‘Enter’.
Step 4: Restart your PC. Doing all this will scan your disk drive and try repairing any errors if detected. Once done, check if the live kernel event 141 error is still resolute or not. Also Read: How to Fix Critical Process Died BSOD Error
Closing Words on How to Fix LiveKernelEvent 141 Hardware Error
We hope that the above-mentioned solutions will help you to fix LiveKernelEvent 141 hardware error. Don’t try them all, just go through them until you find the one that works for you. Do tell us in the comments below if you have any queries or further suggestions. Lastly, do subscribe to our Newsletter for more troubleshooting tips.