No AirPrint Printers Found Error on Mac
While Apple’s AirPrint technology works flawlessly most of the times, it is not uncommon to find a MacBook, iPhone or iPad coming up with ‘No AirPrint Printers Found’ Error Message. The most common reason for this error is due to the MacBook and Printer not being connected to the same Network, but it can also occur due to other reasons. Also, you need to be aware that AirPrint does not work on Public WiFi Networks due to security reasons.
1. Make Sure the Printer is Ready to Print
The first step would be to rule out the possibility of the Printer being in Stand-by or Sleep Mode. Also, take a look at the Printer’s Display and Control Panel to make sure there are no errors or blinking lights. If the Printer is OFF or in Sleep Mode, press the Power button and wait for the printer to initialize and establish wireless connection with your MacBook.
2. Make Sure the Printer is Compatible with Apple Devices
If you are trying to print from Mac to Printer for the first time, make sure that the Printer is compatible with Apple Devices. This should be mentioned in the Manual that came with the Printer. If not, you can take a look at the list of AirPrint-compatible devices as provided be Apple.
3. Restart Printer & Router
In many cases, the printing problem on a MacBook is usually due to minor software glitches and network connectivity issues. This can be often fixed by Restarting the Printer and the Router. Router: Disconnect the Modem/Router from its Power supply source > wait for 60 seconds and connect the Modem/Router back to its Power Supply source. Printer: Restart the Printer and wait for the Printer to initialize and become ready to print. Once the printer is ready, try to print something from your Mac. If you still see “No Printer Found” error, move to the next method.
4. Reset Printing System on Mac
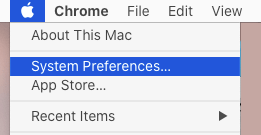
A Printer System Reset will remove the Printer from Mac, allowing you to make a fresh start by Adding the Printer back to your device. Click on the Apple icon in top-menu bar and select System Preferences in the drop-down menu.
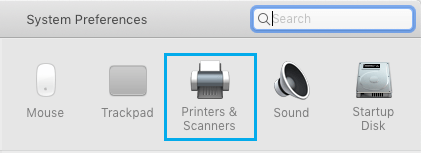
On System Preferences screen, click on Printer & Scanners.
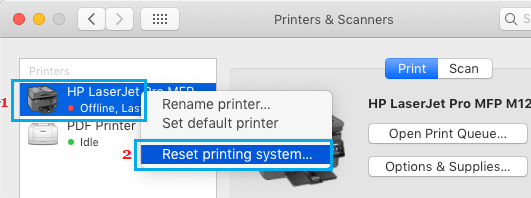
On the next screen, right-click on the Printer and select Reset Printing System option.
On the confirmation pop-up, click on Reset to confirm. If Promoted, enter your Admin User ID and Password to authorize this process. On the next screen, click on the + button to Add the Printer back to your MacBook.
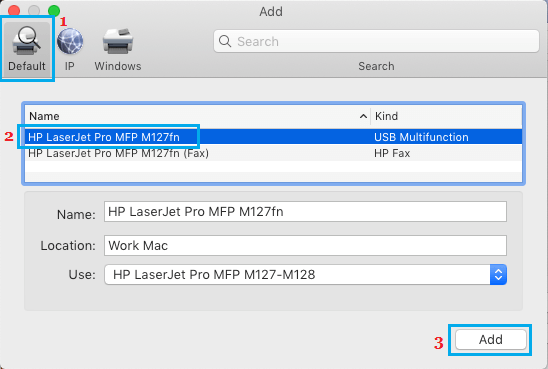
Note: You may be required to click on the Lock icon and enter your Admin User Name and password. On the next screen, make sure you on the Default tab > select your Printer and click on the Add button.
After this, you should be able to Print from your MacBook, without coming across ‘No AirPrint Printers Found” Error Message.
How to Print Two Pages Per Sheet On Mac How to Disable Two-Sided Printing On Mac
![]()