However, the problem is not that common, but when experienced, Windows PC users aren’t able to access the internet – which makes it more crucial to quickly and effectively troubleshoot the error. But, there’s another significant question to be addressed beforehand, i.e, why Ethernet doesn’t have a valid IP configuration on Windows PC? So, before proceeding with the fixes, let’s walk through the main reasons for this error.
What Causes Ethernet Doesn’t Have a Valid IP Configuration in Windows 10/11?
There could be several reasons why you are experiencing this error. While some are related to the network or system setting, others could be related to the connected hardware. Here is a list of them all:
Inappropriate connections.Issues with the router.Malfunctioned NIC, also known as Network Interface Card.Outdated, faulty, or corrupted network adapter driver.Incorrect or misconfigured settings.
How to Fix Ethernet Doesn’t Have a Valid IP Configuration [Windows 11/10]
Here are a few non-cumbersome and effective solutions for you to fix Ethernet doesn’t have a valid IP configuration error on Windows 11/10.
Solution 1: Reinstalling TCP/IP
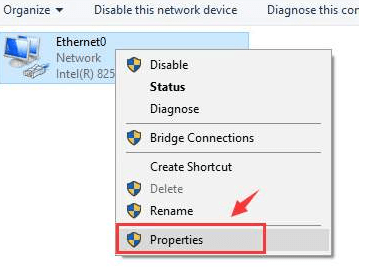
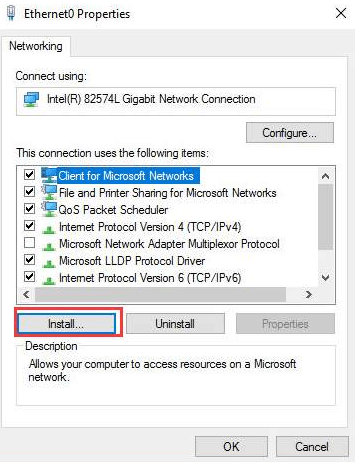
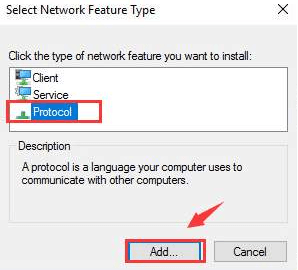
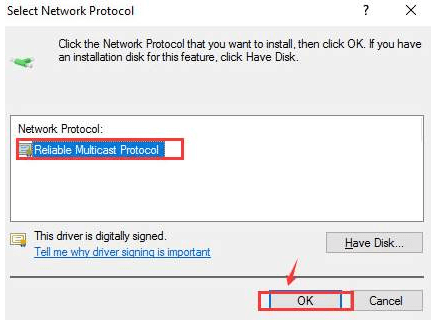
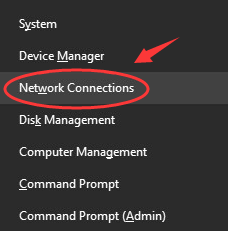
Faulty or incorrect TCP/IP protocol might be responsible for Windows 11/10 Ethernet doesn’t have a valid IP configuration problem. To resolve this, you can try to reinstall the TCP/IP. Here is how to do that: Step 1: Simultaneously press the Windows logo and X keys from your keyboard, and choose Network Connections. Step 2: Click right on your network adapter and choose Properties. Step 3: Click on the Install…option to proceed. Step 4: In the next prompt, choose Protocol and make click on Add… Step 5: Now, choose the Reliable Multicast Protocol option and click on Ok in order to install the protocol. Wait for the process to finish and then try to reconnect your WiFi or Ethernet to check if the connection issue is fixed. If this trick didn’t work for you, then jump on to the next solution. Also Read: Realtek Ethernet Controller Driver
Solution 2: Turn Off Fast Startup
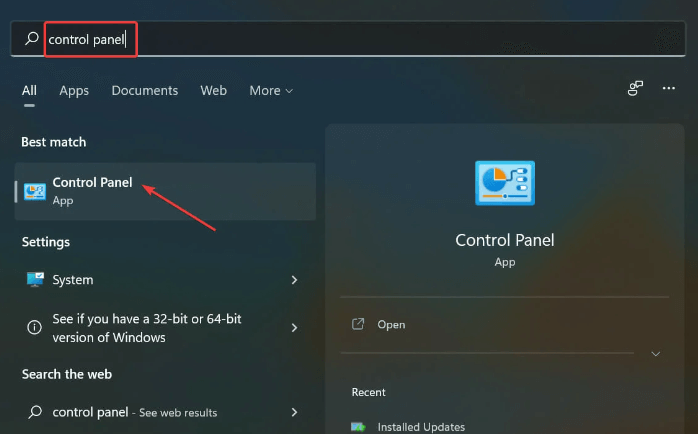
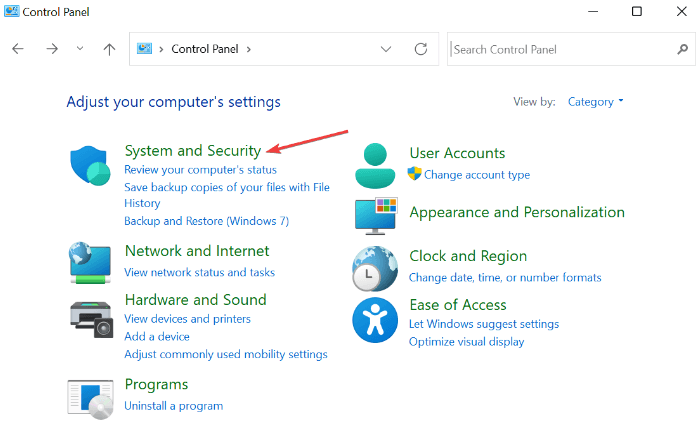
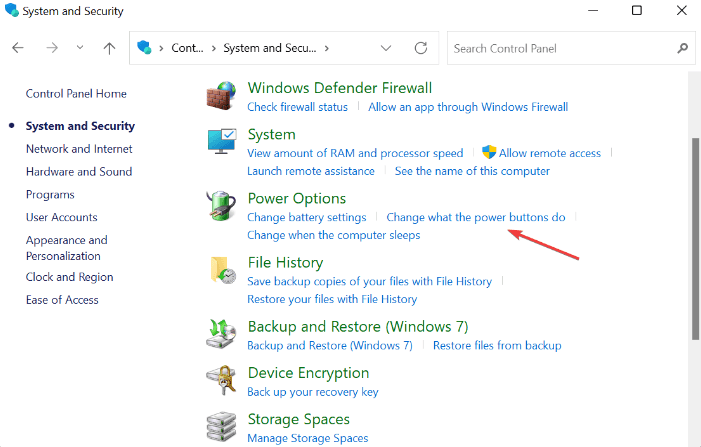
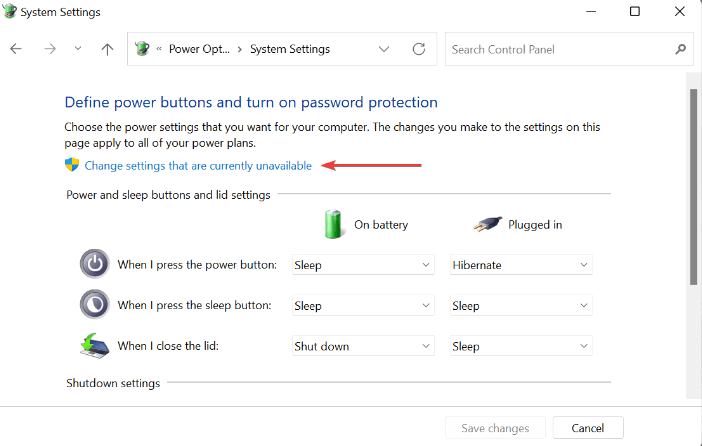
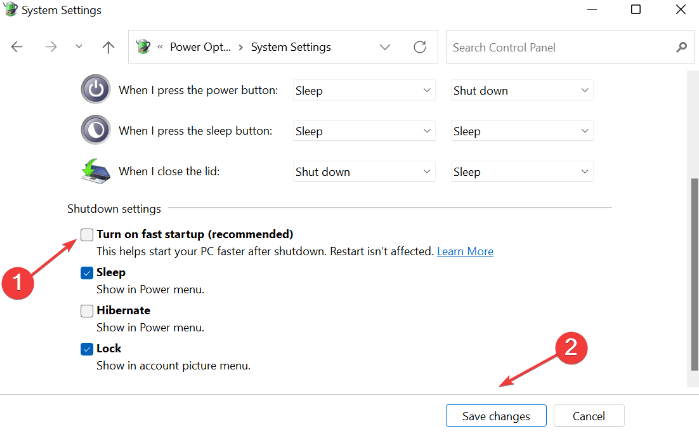
In Windows, Fast Startup is a feature that eliminates the time required by the operating system to load when you try to turn on the PC. This is executed by keeping particular drivers and associated processes or programs running in the background instead of removing them at the shutdown. But this feature is sometimes found to conflict with the functioning of attached devices to misconfigured or incorrect commands relay. If that is the case, then disabling this feature should help you get rid of Ethernet doesn’t have a valid IP configuration error in Windows 11/10. Here’s how: Step 1: Hit the Windows logo and S key together to open the Search menu. Input Control Panel in the text field and make a click on the accurate search result that displays. Step 2: After that, click System and Security. Step 3: Under Power Options, click Change what the power buttons do. Step 4: Next, click Change the settings that are currently unavailable. Step 5: Lastly, unmark the checkbox shown before the Turn on fast startup (recommended) and then make a click on Save changes to proceed. Once done, reboot your computer to apply the changes and test the issue. If the Ethernet doesn’t have a valid IP configuration Windows 11 still persists, then try other solutions. Also Read: How to Fix Ethernet Port Not Working on Windows
Solution 3: Update Network Adapter Drivers
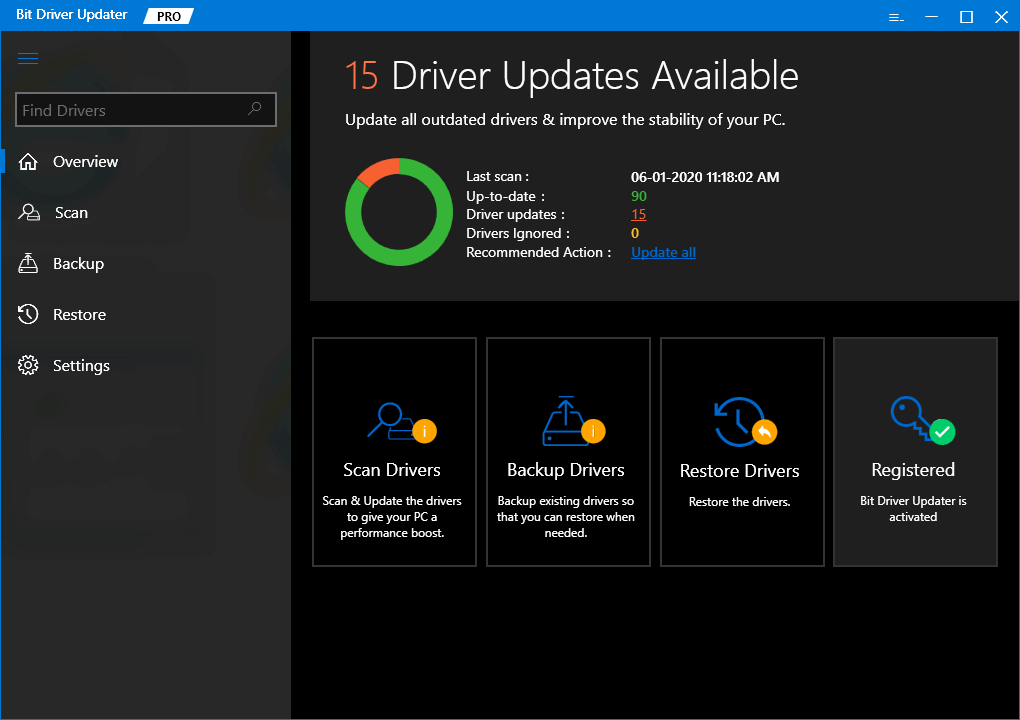
You may encounter network issues if your network adapter drivers either have become corrupted or gone missing. Therefore, updating the network drivers is the best way to deal with such problems. Users can check for the latest driver updates in Windows Update or manually download & install it from the official website of the manufacturer. Additionally, there is a simpler & quicker way of updating the outdated device drivers i.e., using third-party software. We recommend Bit Driver Updater, dedicated software that will automatically run a thorough scan on your computer for the latest driver updates and install the most compatible ones on its own without any hassles. Not only that, but the tool also keeps every bit of PC updated and enhanced so you’ll always enjoy the better and more consistent performance of your device. Most prominent features of Bit Driver Updater:
One-click driver update functionality.Top-notch performance.System optimizer.Scan scheduler.Auto-backup & restore wizard.24*7 technical support.Full money-back guarantee but for a limited time.Automatic updates.
Steps to update network adapter drivers via Bit Driver Updater: Step 1: From the download button given below, get the setup of Bit Driver Updater for Free.
Step 2: Double click on the software installer and follow the wizard to complete the installation. Step 3: After the successful installation of Bit Driver Updater, run the driver updater on your computer and click on Scan. Step 4: Wait for the process to finish. Click on the Update Now button adjacent to the problematic network adapter driver. If you are using Bit Driver Updater’s pro version, then you can update other drivers as well along with updating the network drivers. For this, you simply need to click on the Update All button instead. That’s all! Once the latest version of drivers is installed, then check to see if the Ethernet doesn’t have a valid IP configuration Windows 11/10 is solved. Proceed with other tactics if this didn’t work. Also Read: HP Network Driver Download and Update for Windows
Solution 4: Run Command Prompt
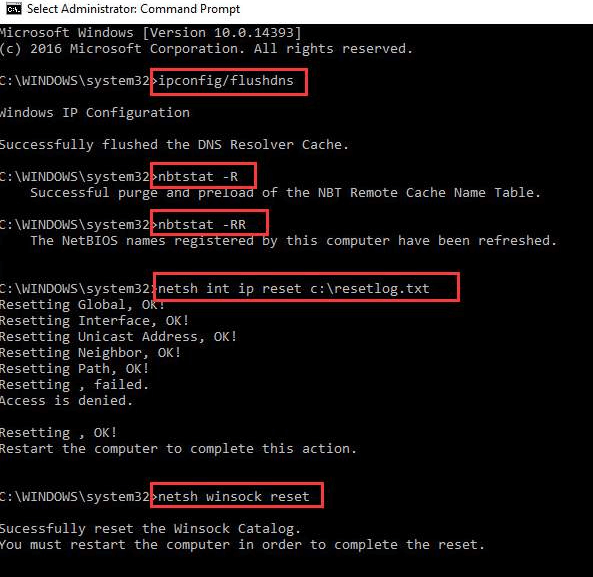
Sometimes, refreshing your network settings works like magic. Follow the steps below to do so: Step 1: Launch Command Prompt as an Administrator. Step 2: If a pop-up appears, click YES to continue. Step 3: Write the following commands in the Command Prompt (Admin) window and be sure to press Enter after each command.ipconfig/flushdnsnbtstat -Rnbtstat -RRnetsh int ip reset C:\resetlog.txtnetsh winsock reset
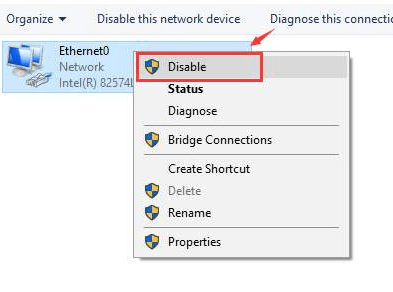
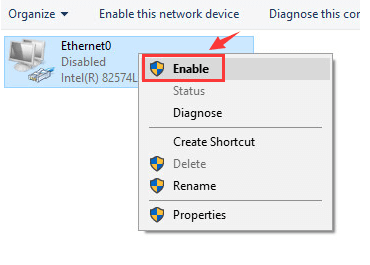
After this, reboot your PC to implement the changes. Step 4: Altogether hit the Windows and X keys from your keyboard and choose Network Connections. Step 5: Right-click on your network adapter and choose Disable. Although, this requires the administrator’s permission to continue the process. Step 6: Click right on your network again and choose Enable. Once enabled, try to check your network connection just to see if the problem is fixed. If not, move on to another solution.
Solution 5: Modify Network Adapter Settings
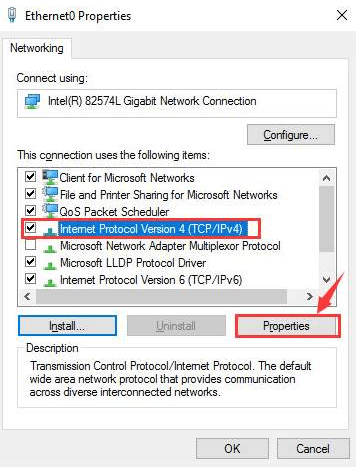
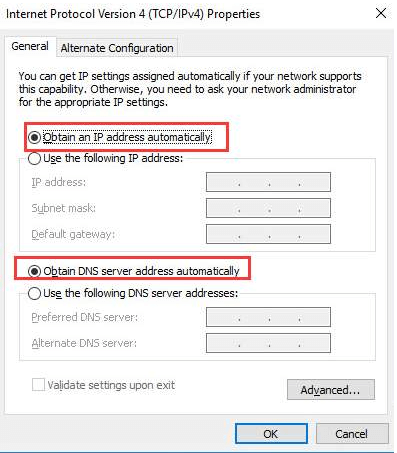
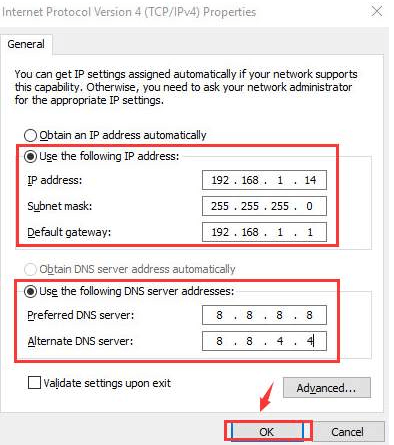
Nothing has resolved the Ethernet issues from above? Don’t worry, try changing network adapter settings as a last resort. Sometimes, faulty network settings might be the culprit behind this inconvenience. To fix Ethernet doesn’t have a valid IP configuration error, follow the steps shared below: Step 1: Press Window and X keys together on your keyboard. Step 2: Choose Network Connections from the available options. Step 3: Click right on your network adapter and click on Properties to proceed. Step 4: After that, select Internet Protocol Version 4 (TCP/IPv4). Step 5: Next, click on Properties. Step 6: In the subsequent prompt, click on Obtain an IP address automatically and Obtain DNS server address automatically. Step 7: If the issue persists, then choose to Use the following DNS server addresses and Use the following IP address. Lastly, click on OK to save the new changes. Once done, reboot your computer, hopefully, this should get the error fixed. Also Read: [Fixed] Network Discovery is Turned Off Windows
Ethernet Doesn’t Have a Valid IP Configuration on Windows 11/10: FIXED
We hope the tips & tricks listed in this article help you fix Ethernet issues like Ethernet doesn’t have a valid IP configuration and more. Please tell us in the comments section below, which solution worked for you. In addition to this, drop your suggestions or tips regarding the same. Before you go, do subscribe to our Newsletter for more information related to technology. Furthermore, you can also follow us on our social media: Facebook, Twitter, Instagram, and Pinterest.
