The more you work on your PC, the more complicated or daunting it is to keep the hard drive files or overall system organized and enhanced. You probably ended up with slow PC performance. There are an immense amount of duplicate files that make your computer slower than expected. Cleaning your system is a must but it can be an error-prone or tedious process to find duplicate files manually. dupeGuru is a globally recognized tool to automatically find and remove duplicate photos on Windows, Mac, and Linux. Is it safe to use? Does it do a good job of detecting and removing dupe shots? Let’s find out!
What is dupeGuru?
Developed by Hardcoded Software, dupeGuru is the open-source cross-platform GUI program that can find and delete duplicate files on computers. It is compatible with common file types including documents, archives, audios, and images. It has multiple functional modes and scan types to provide ease of use. The software also lets you filter specific files by keywords.
Full Specifications of dupeGuru:
Supported OS: Mac, Windows, and Linux License: Freeware File Size: 22.6 MB Available in: 12 Different Languages Also Read: Quick Photo Finder Review 2021: Product Features & Details
Notable Features & Highlights of dupeGuru
This section will mainly present the dupeGuru features. Let’s read them below:
1. Interface
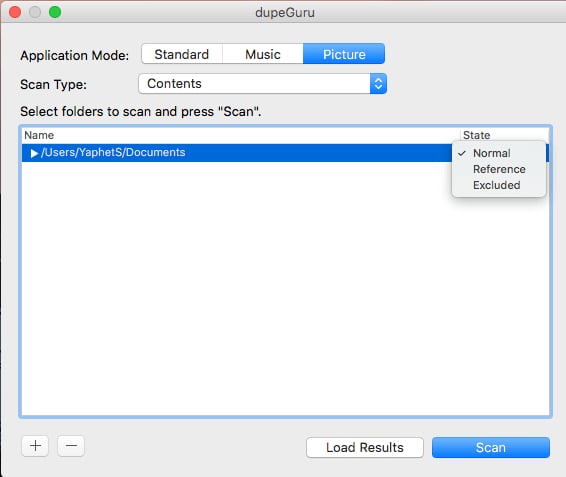
If we talk about the interface of dupeGuru, it has a neat, simple, and uncluttered interface. It is divided into three parts. The first part is Application Mode, where you will see 3 different modes including Standard, Music, and Picture. Moving on to the second part, that’s Scan Type, where you can see different file types according to the particular modes. The last part is the field utilized for adding the folders you wish to scan.
2. Fast & Smart Scan
The software uses smart algorithms and parameters to finish the scanning process quickly. It makes sure to find and delete every trace of duplicates or even identical files in order to enhance the storage space.
3. Preview Option
One of the most important features of dupeGuru is it comes with a default image preview option that lets you view the duplicate files before erasing them.
4. Exclusion
If in case, you wish to keep some of the dupe shots or identical files, then you can use dupeGuru’s exclusion feature and manually choose the files you don’t want to delete.
5. Freeware
dupeGuru is completely free-to-use and open-source software to identify and remove duplicate files on your Windows or Mac computers.
6. View Modes
It contains three view modes, Details, Dupes Only and Delta. You can see the scan results using any of the view modes according to your preference. Apart from that, you can also sort and filter the scan results by using its special filtering option. For instance, if you wish to see only png files, then type “png” and press Enter. This only displays the PNG files. Also Read: 15 Best Free Photo Recovery Software to Recover Deleted Images
Why Should you Use dupeGuru?
Apart from the above-mentioned features, some other unique features make dupeGuru a perfect choice for finding and removing duplicate pictures on Mac, Windows, or Linux devices. We have mentioned them below, take a closer look at them!
1. Automate Process
Searching for the redundant files that are taking up an ample amount of space manually is a bit tedious task to accomplish. But, after the arrival of dupeGuru, it is just a matter of a couple of clicks. The duplicate file finder makes every bit of the process much easier by automating the complete process.
2. Several Clean Up Options
The program possesses dozens of built-in cleanup options to free up a good amount of storage space on your computer. dupeGuru can be anything for you: a cleaning software, and a performance booster. You can sort and filter files by file type, size, match level, modification, folder, etc.
3. Multiple Language Support
The language will not be a barrier anymore for PC users. As dupeGuru is available in 12 different languages including German, English, Italian, Japanese, and so on.
4. Time Saver
Finding and deleting the duplicates manually can be an error-prone or time-consuming process, especially for novices. Here comes dupeGuru as a savior with a much-needed feature called one-click removal. This feature helps you select and delete all unwanted files at once, which eventually saves a lot of time and effort from the user’s end.
How does dupeGuru Works?
In this part, you will learn how to use dupeGuru on Mac or Windows. Below is a step-by-step guide that explains how this duplicate photo finder and remover functions.
Steps to Use dupeGuru on Mac:
Step 1: To get started with, download, and launch dupeGuru on Mac. Step 2: Then, select an Application Mode and Scanning Type. Step 3: After that, make a click on the + button that appeared in the lower-left corner to add folders into the scanning window. And, if you want to exclude the subfolders, then you can do so in the State column. Step 4: Next, click on the Scan option.
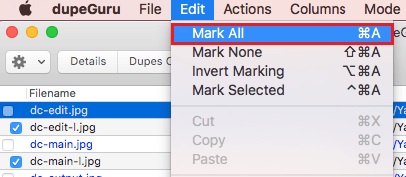
Step 5: Wait until the program completes the scanning process. Once done, it will provide you with a detailed list of all duplicate files. Now, you can view details, preview, and sort or filter files. Step 6: In order to choose all dupe shots, head to the Edit and then choose Mark All from the context access menu list as shown below.
Step 7: Now, to delete all selected duplicate files in just one click, choose Actions and then click Send Marked to Trash option. Kudos! All unwanted duplicate files are deleted at once. See how simple & quick it is to speed up the performance of your Mac using dupeGuru. Also Read: How To Delete Duplicate Photos Of Different File Formats
Steps to Use dupeGuru on Windows:
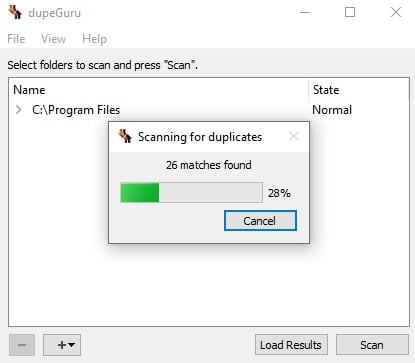
Step 1: Download and install dupeGuru on your Windows PC. Step 2: Run the utility program and choose the Application Mode and Scan Type. Step 3: Click on the + icon to add folders and click Scan. Now, wait until it scans your machine for duplicate or identical files.
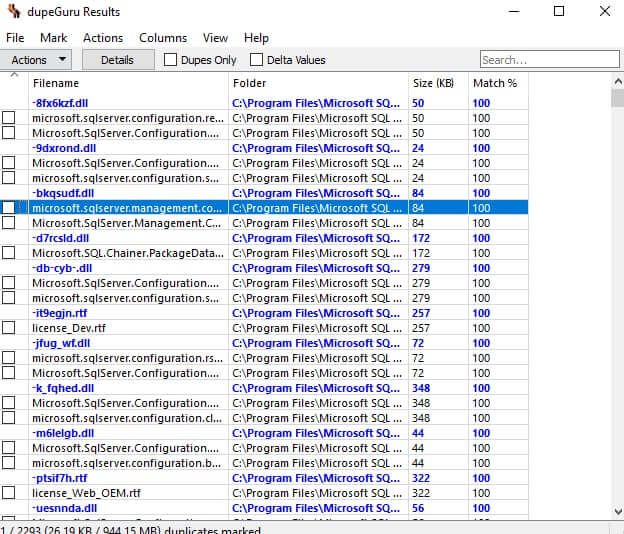
Step 4: Once the scanning process is completed, it shows all the detected duplicate files.
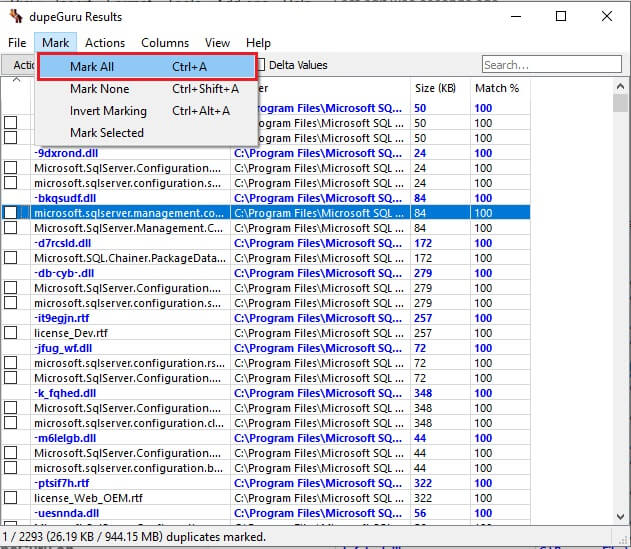
Step 5: You can sort and filter duplicate scans if needed. And, select the files you want to remove. Step 6: If you want to remove all duplicates in one click, then go to the Mark option and choose Mark All or the other desired option.
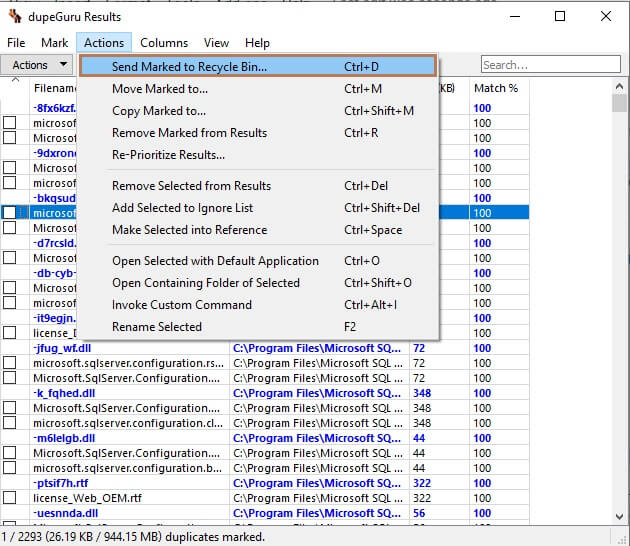
Step 7: Then, head to the Actions and select Send Marked to Recycle Bin or other desired option. If a confirmation box prompts, check the box presented before Directly delete files, and then Proceed.
Step 8: Wait until the duplicate finder and cleaner program completes the process. It is one of the best photo duplicate finder tools available in the market. Irrespective of being freeware software, dupeGuru is an excellent way to keep a PC organized and enhanced.
Pros & Cons of Using dupeGuru
Just like any other software, there are some benefits and drawbacks of using dupeGuru. Check them out below:
Pricing Structure of dupeGuru:
Since it has a freeware license, anyone can find and remove duplicate files using dupeGuru for free. There are no additional fees or charges. You can access all its features absolutely free.
Lightweight and free-to-use tool.Multiple view and scan modes.Compatible with numerous file types.Recognize dupes through filename, content, etc.Quick and reliable deletion of unwanted duplicate files.Multilingual support.One-click removal of duplicates.Preview dupe shots before removing them.
The interface is outdated.Not a perfect pick for beginners.Lags while scanning for an entire hard drive.
Also Read: Top 10 Best Duplicate Photo Finder and Remover Apps for Mac in 2021
Closing Words: dupeGuru Review 2021
So, that’s all from the dupeGuru review. We hope you have found the valuable information about the duplicate photo cleaner which helps you make a worthwhile decision. If you think we missed something to mention regarding the same then you can drop it down in the comments box. We will definitely add your suggestions to the write-up. Before you go, for reading more software review articles, do subscribe to our Newsletter and follow us on Social Media: Facebook, Twitter, Instagram, or Pinterest.
